
- Adobe Connect
- iPhone / iPad
- Moodle
- Office 365
- Pre-Office 365 (2019, 2016, etc.)
- SAGE
- Useful Links
- Zoom
iPhone Mail App "Your email access has been blocked" Message
Users that are using the iPhone Mail application may receive a message stating that their e-mail access has been blocked by Contact North | Contact Nord IT Department: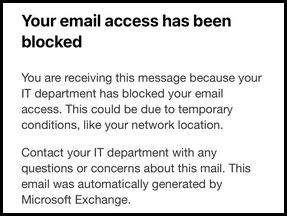


This message is received due to changes in the way authentication and security are being handled by Contact North | Contact Nord and Microsoft 365 in the background.
In order to fix this issue, perform the following steps:
Ensure Multi-Factor Authentication (MFA) is Setup on Your Contact North | Contact Nord Account
1) Proceed to https://myaccount.microsoft.com and sign-in with your @contactnorth.ca account.
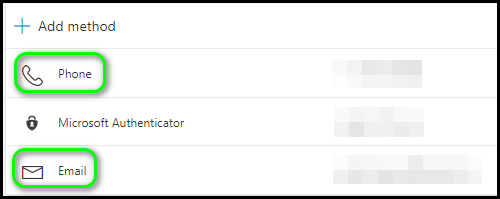
2) On the left side, navigate to Security info
If you see an Email or Phone listed, proceed to the next section Delete and Re-add iPhone Mail Account:
If only Microsoft Authenticator is listed, or nothing is listed, then:
3) Select + Add method
4) Either choose Phone or Email
5) Follow the on-screen instructions to setup your phone or e-mail for self-service password reset.
6) You can now proceed to Delete and Re-add iPhone Mail Account.
Delete and Re-add iPhone Mail Account
1) On your iPhone, navigate to Settings >> Mail >> Accounts
2) Select your Contact North | Contact Nord e-mail account (it may be listed as "Exchange")
3) Click Delete Account at the bottom of the page, and then Delete from My iPhone.
4) Exit Settings and return to the home screen of the phone. Open the Mail app.
5) When prompted to select an account type, choose Microsoft Exchange.
6) Enter your @contactnorth.ca e-mail address. If you wish you can enter a description, though it is not necessary.
7) Click Next in the top-right corner.
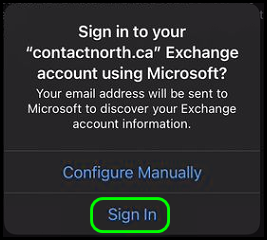
8) When prompted to Configure Manually or Sign In, select Sign In.
9) Select Continue if prompted. Sign in with your @contactnorth.ca e-mail and password if required.
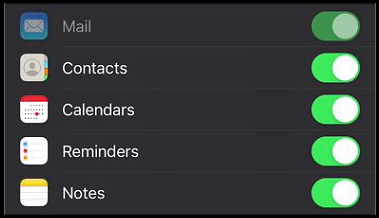
10) Make sure all of the options are selected (Mail, Contacts, Calendars, Reminders, Notes). Select Save in the top-right.
11) Your account is now added, but will not initially show the inbox. Select Mailboxes in the top-left.
12) Select Inbox.
Your mail should now begin to populate.
DataImage4.png
DataImage4.png
DataImage4.png
DataImage4.png
DataImage4.png
DataImage4.png
DataImage4.png
DataImage4.png
DataImage4.png
DataImage4.png
DataImage67.png
DataImage67.png
| Files | ||
|---|---|---|
|
DataImage4.png 54 KB resend |
||
|
DataImage4.png 13.4 KB resend |
||
|
DataImage4.png 15.6 KB resend |
||
|
DataImage4.png 13.3 KB resend |
||
|
DataImage4.png 30.9 KB resend |
||
|
DataImage67.png 72.3 KB resend |
 Get help for this page
 Jitbit HelpDesk